Monday, August 18, 2014

How to get perfect winged liner - every time!

Hello beautiful people! It's been waaaaay too long since my last blog post. Promise I didn't do it on purpose ;)
Our laptop decided to go crazy and had to be sent out to be fixed. But i'm back now! *yay*

How many of you hate applying eyeliner? How many of you HATE trying to add a "wing" to it? Uh, i'm raising my hand too. When it comes to eyeliner, I can get really impatient. And if it doesn't come out perfect the first time I pretty much just start from the beginning...or give up lol -____-

So today I'm going to share my trick (that's probably been around for a while) to getting the perfect winged liner EVERY TIME! Yeah, I said it...EVERY. TIME. I haven't messed up yet since using this technique!

You're only going to need 2 items - Tape (Yes, tape...) and your favorite liner. You can use liquid, gel, pencil, whatever you feel comfortable using! I'm using Stila's Stay All Day Waterproof Liquid Liner.


Take 2 small pieces of tape and place them on the back of your hand. This helps the tape be a little less sticky so when you remove the tape at the end, it's not tugging on the skin too much.


So, placement of the tape is pretty much your preference. You want to line it up with your lower lash line and the end pointed toward the end of your brow. Depending on the shape you want, move the tape wherever you are comfortable having the end of your liner.


After I've got the tape where I want it, I take my liner and trace along the edge of the tape.


After I've got that line down I draw another toward the center of my lash line and fill in.


After that you can line the rest of your lash line and make it as thick / thin as you want! I didn't take mine all the way in as it can sometimes make your eyes smaller.
(I also wanted to it be a little less dramatic)


You're almost done! Remove the tape you to reveal your hard (easy) work!


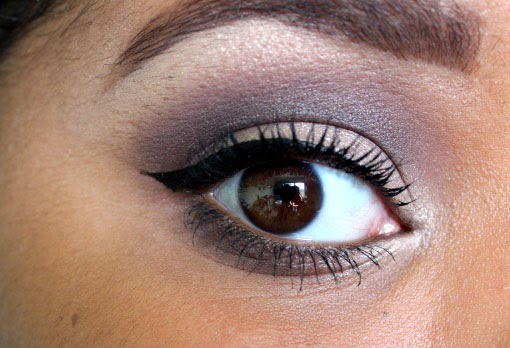
Here's the finished look! 
Let me know if you try this technique, and if it helped! ;)

Till next time!

<3 Caitlin


Monday, July 28, 2014

Brow Tutorial!

I've probably said this about a billion times, but brows are SUPER important. At least they are to me ;)
They frame your face and pull any look together. Now, I'm showing you how I fill in my brows. It could come off a little dramatic to some, but I've finally gotten them to the shape I like! Here's some of my tips and tricks to getting the perfect brow!


Here are the products I use to perfect my crazy brows!

The 3 brushes I use are a spoolie brush, an angled brush, and a small concealer brush.
To fill in my brows I use Anastasia DipBrow Pomade in Ebony. This. Stuff. Is. AMAZING. It's so easy to blend, it's waterproof, and doesn't budge in this crazy Florida heat. 
For concealer I use Maybelline Age Rewind Concealer. You can really use whatever concealer you want. 

Here's my bare face!
Scary right?! ;)

On with the tutorial!

The first thing I do is grab my handy dandy spoolie! I use this to comb the brows into place, mostly pushing the brow hairs up and out toward my ear. This is also going to come in handy later on!


Next, I take my angled brush and VERY lightly dip it into the pomade. I start in the middle, underneath the brow and trace diagonally upwards. 

After I've done that I define underneath the tail of the brow. 

Next, fill in the outer half and trace the rest of the lower half of the brow. You allllllways want the tail of the brow to be darker than the front.

Whatever product is left on my angled brush, I trace the upper part of the brow stopping just before the inner portion. I like a more gradient effect.

After that, I just fill in the rest of my brow! Now, I'm not a huge fan of the harsh look. I want defined brows but I kinda don't want to look like a cartoon character. Sooo....

I take my spoolie brush and run it a few times through my brows to soften the look. 

Aaaaaand for your enjoyment, here's only one eyebrow done ;P

SO, after I get my eyebrow looking half way decent, I clean up underneath the brow with a little bit of concealer. I've seen LOTS of people take concealer above the brow, & more power to ya if you do, but I find that look a little unnatural and cartoonish.

 Blend it out with your ring finger....

And were done! Hope you enjoyed! If you have any questions, don't hesitate to ask! 


Stay tuned for how to get perfect winged liner EVERY TIME! ;)

<3 Caitlin


Tuesday, July 22, 2014

Urban Decay Naked 2 Pictorial!

I absolutely adore this palette! It's full of neutrals and the shadows are very pigmented and easily blended.


I've already applied my foundation, concealer, & brows!


Next I'm taking the color Tease with a big ole' fluffy blending brush and applying it to my crease & lower lash line. The key to blending is making small circular motions in a windshield wiper shape. Keep blending until the shadow is really blown out and soft looking. BLEND UNTIL YO FINGAHS HURT! It should look a little something like this...


Next I'm taking a flat shader brush and applying the color Bootycall to my lid, brow bone, and the inner corner of my eye.


Remember to B L E N D after each step ;)

With a tapered blending brush I applied Busted slightly above the crease. After applying be sure to blend UPWARD kind of creating a soft cut crease. I also applied it to the outer half of the lower lash line.


Last, but not least, I added a winged liner (tutorial coming soon!) and mascara!


Thanks for stopping by! Let me know what you'd like to see next! ;)

<3 Caitlin


Saturday, July 12, 2014

Summer Makeup Routine

During the summer months I try to keep my makeup to a minimum. It's crazy hot, and most days I tend go without makeup anyway. But for the days I want to look a little more put together this is usually what I do :)


Summer Makeup Routine


The first thing I do is cover an imperfections! I love Tarte's BB Tinted Treatment! It has lots of great benefits too! It works as a primer, moisturizer, light foundation, anti-aging treatment, and sunscreen for a youthful looking glow. 


For the summer i DEFINITELY need to set any cream product with powder. This "Set It & Don't Fret It" mineral powder by NYX is light weight and keeps me shine free all day!


Next up is brows! I absolutely love this product because it's waterproof and does not budge! So if you're worried about going to the beach or pool and don't want your brows coming off, this is for you! I use Anastasia DipBrow Pomade in Ebony.

On to eyeshadow! I'm currently obsessed with the Lorac Pro Palette. It's very versatile. You can create something simple or go dramatic. Today I decided to go simple with just a light wash of the color Lt. Bronze on the lid & brow bone and Mauve in the crease!


Nothing crazy as you can see. Very simple ;)


I used CK Mascara which I believe is waterproof. It's a beast to get off, but I love the length and volume it gives my lashes. It has a twisty cap that changes the brush to give a different affect.


Next up is blush and bronzer which is pretty self explanatory! I used Elf's Fushia Fusion for blush. I love this because it almost doubles as a highlight! It has small specks of glitter to bring light to the cheeks! As for the bronzer I used NYX Matte bronzer in deep tan. I take a large fluffy brush and apply it to the hollows of my cheeks, forehead, and jawline!


Here's the finished look in artificial & natural lighting!


Thanks for stopping by! Have any requests or questions? Leave them below!

<3 Caitlin


Wednesday, July 2, 2014

Glamour Mini Sessions!

I'm SO excited to be teaming up with the beautiful and talented Gina, from Gina Christiansen Photography! Information about location, times, and pricing will listed below :)

Be sure to follow her blog at ginachristiansenphotography.blogspot.com & like her Facebook page for more information and services she offers!

Now, here are some before and after's!

For Giselle I went for a more natural look. This girl is seriously so gorgeous! It didn't take much to enhance her natural beauty.

For Racquel we went with a Hollywood Glam look! I LOVE the red lips on her!

Unfortunately I didn't get a before picture of our third model Kiersten! I decided to give her a more of a dramatic look with creme contouring and a sultry smokey eye! Here are some pictures from the shoot! All photos are courtesy of Gina Christiansen Photography.


If you're interested in these mini sessions, please contact Gina or myself! These are for a limited time, so hurry and reserve your spot today! 

<3 Caitlin 


Sunday, June 29, 2014

Glowy Bridal Makeup

This beautiful woman is Nicole. She is our awesome office manager at SpaRenity and she so graciously agreed to be my model for the afternoon! Since we are in wedding season, I figured a glowy, glamorous look would be appropriate :)
All products used will be listed below!  

Here is Nicole before...

And then we decided it would be fun to have a little photo shoot ;)
Although she's not actually engaged, she will make a GORGEOUS bride one day!

F A C E : Jane Iredale Smooth Affair Primer
JI Dream Tint Tinted Moisturizer
JI Amazing Base in Warm Sienna
JI So Bronze-3
JI Blush in Dubonnet

E Y E S : Shadows; Lorac Pro Palette
Salon Perfect Lashes in Demi Whispies

L I P S : Jordana Lip Liner in Tawny
NYX lip gloss in Tiramisu


One of my favorites!